3. Installing Non-Steam Games
Downloading Games
Recommended Sites
There are a lot of sketchy cracked game sites out there, so I would be exceptionally careful. These are the sites I've used and I haven't had any issues so far:
- Fit-Girl Repacks
- Type: Installers
Safety: A+. Everything is double- and triple-checked and 100% safe. - DODI Repacks
- Type: Installers
Safety: C+. I've never had a problem, but there've been a few malware reports from this site recently. - SteamUnlocked
- Type: Portable
Safety: B+. They're my primary portable game-rip source and I've never had a problem, but they've had a few bad reports. - SteamRip
- Type: Portable
Safety: A. Good, slightly smaller list of games but they have a good reputation. - NEW! IGG Games
- Type: Portable/Installers
Safety: Unknown. Adding this as they have a very extensive game list, and they seem to be safe, but I don't have a lot of experience with them yet. They also offer a mix of portable and installer game types. - NEW! AnkerGames
- Type: Portable/Installers
Safety: Unknown. Very flashy site with fast direct download and torrent options, although I've found their offerings to be on the limited side. - RuTracker
- Type: Installers
Safety: A. This is a semi-private (ie. you'll need to register for an account and sign in) Russian torrent site with a great selection of games and everything else.
You can (and should) install qBittorrent on your Deck from the Discover store and download using torrents from the repack sites. If those sites offer a Magnet link, use those as they tend to be the most up-to-date in my experience.
The portable sites above use in-browser servers like Uploadhaven, GoFile and MegaDB - they tend to be slower, with daily download limits based on IP address, but they usually don't have a torrent option.
You should also install a good adblocker before using any of the above sites, and note that you'll have to translate RuTracker pages from Russian to English.
Game Updates
Installing updates for games you already have (or repacks that aren't fully up-to-date) is a GIGANTIC PAIN IN THE ASS. It's also sometimes unavoidable. I wish to God repack sites would re-repack games when updates come out but they generally do not. Portable sites do tend to have the latest available versions up at any given time (which is another reason to prefer them over repacks).
The problem is that different groups might release different initial versions in their repack, meaning that you sometimes have to find the right update path for your particular repack group's initial release. You might install five correct updates, then install one wrong update and the entire game is corrupted (luckily, while this requires that you reinstall the game from scratch, it usually doesn't impact your save files, which are stored in your prefix and not the game's folder.)
A great example of this is Dying Light: The Beast, which has two separate update paths that eventually merge, containing about a dozen updates in total, and which I could never get working on my gaming PC.
Anyway, sometimes you have to install an update for a game repack. In that case, you would download it from the original repack site (usually an ElAmigos update link) and follow the steps outlined for Installer Packages below to run an EXE inside the game's prefix from within Lutris.
Adding Games To Heroic
Game Installer Types
In general, you're going to get games in a few different formats:
- Zipped portable installs.
- Windows installer packages.
- Non-Windows games (ie. Switch) running inside a bundled emulator.
- ISO images.
Portable Installs
Whenever possible, I recommend going with a portable install as they're the easiest to work with:
- Right-click on the .zip > Extract.
- Move the game folder to /home/deck/Games or your SD card.
- Rename the folder to clean it up (ie. Citizen.Sleeper.v1.12.50 to just Citizen Sleeper).
- In Heroic, go to Library > Add New.
- Enter the game name, or copy-and-paste it from its folder.
- Click on Images and select the game from the list.
- Select a poster and, optionally, a hero image for the game.
- Click on Show Wine Settings and verify:
- Prefix Path: /home/deck/Games/Heroic/Prefixes/sideload
- Wine Version: GE-Proton10-34
- (You don't need to do this every time, but it's a good idea to check it the first few installs to make sure they're set as the default).
- Select Executable: Click on the folder icon and browse to your unzipped game folder. Select the game's exe.
- NOTE: Try to avoid any launcher.exe-type files if you have the option and instead go with the game's actual .exe. Also, sometimes these aren't in the root folder but are under bin, Binaries, Release, or something similar. Sometimes they're two or three folder levels deep.
- Click on Finish.
This will create a game entry in Heroic and also automatically send a shortcut to Steam (although you'll need to restart your Deck before Steam will pick them up.)
Portable Game Folders
You'll notice that in the root folder of unzipped games, there will be some promotional links, readmes, a Redist folder and the actual game folder.
You can and should copy just this internal game folder out to /home/deck/Games.
Pinning Games Folders To Places
In Dolphin (the Linux file manager that the Steam Deck uses), right-click on each of your Games folders and select Add To Places. This pins them to the Places section on the left, and makes it a lot easier to navigate to when adding game executables.
This will come in very useful in the next section.
Manual Installs
Often in the case of repacks like those from fit-girl or DODI, you'll have an actual Windows installer you need to run in Linux to get the game installed.
Once again, Heroic makes this incredibly easy:
- Right-click on the .zip > Extract.
- Move the installer folder to /home/deck/Games/-= Downloads =- (or wherever you prefer - this is just a temporary folder to hold it while it installs.)
- In Heroic, go to Library > Add New.
- Enter the game name, or copy-and-paste it from its folder.
- Click on Images and select the game from the list.
- Select a poster and, optionally, a hero image for the game.
- Click on Show Wine Settings and verify that they're correct:
- Prefix Path: /home/deck/Games/Heroic/Prefixes/sideload
- Wine Version: GE-Proton10-34
- Leave the Game Executable path blank for now and click on Run Installer First.
- Navigate to the game installer and run it.
- The default path is usually fine, but for reference, C:\Games usually corresponds to internal storage and D:\Games usually corresponds to the SD card.
- Different installers will have different options, but generally speaking you'll want these set:
- Stop the installer's music (or just mute your Deck audio).
- Check Copy Crack\Contents Of XXXX Folder.
- Uncheck any install options for dependencies (ie. DirectX, anything Runtime-related, etc.).
- Let the installer finish. Depending on the size of the game, this could take anywhere from a few minutes to over an hour. Close the installer when the install is complete.
- Select Executable: Click on the folder icon and browse to game's install folder. Select the game's exe.
- Click on Finish.
Once again, this will send a shortcut to Steam which will require a reboot to get picked up.
You can then delete the original install folder. Don't forget to periodically go to Trash in Dolphin, right-click and select Empty Trash, or those files will just sit there taking up space.
Pre-Packaged Emulated Games
You'll sometimes see a game repack that mentions Ryujinx\Yuzu. These are Switch game ROMs packaged with a Windows emulator that you can install and run as if they're native Windows games. This means they're adding ANOTHER layer to the ecosystem because they have to emulate Switch, on an emulated Windows environment, on Linux, which passes them to Steam.
I haven't tried installing these in Heroic yet, but either way I'd recommend that you try to avoid them. The better option is EmuDeck or RetroDeck, game managers designed specifically for emulation.
I'll go over how to set this up in a later section.
ISO Images
A lot of torrent sites will include repacks in .ISO disc image formats for some reason. Although it's possible to do, these are a pain to deal with in the Steam Deck's Linux environment directly, so I recommend this workaround instead:
- Download (or copy) the .ISO file to a Windows machine.
- Install Virtual CloneDrive.
- Mount the .ISO with VCD and browse to its contents in File Explorer.
- Copy the contents to a new folder on your desktop.
- Copy that folder back to the Steam Deck.
From there, you'll have to figure out if the game is portable or requires installation.
Heroic & Redistributables
There's one more thing you should do, after you've installed at least one game but before you boot back to Game Mode: installing redistributables via Winetricks. This assumes that all of your games are sharing a single prefix (usually /sideload):
- Navigate to any game in your library, right-click and select Settings.
- Under Wine, scroll down to the very bottom and click on Run EXE On Prefix.
- Select the AIO Redist Package downloaded earlier and run through the install.
- Close everything once completed.
This should be enough to get you started. If you ever find that a game won't launch and gives you an error about something missing, you can install it by opening Winetricks for any game in Heroic. You can then search for that missing component by name and install it.
That being said, less is more here: try launching all games first, and if they're missing something, they should tell you that and you can come back here and install it. Once it's installed for one game, it's installed for every game that shared that prefix, so you generally shouldn't ever have to install components more than once.
NOTE: This can get tricky, which is why I'm avoiding discussing it in detail. Getting some of these dependencies to install may require going into winecfg and settings the OS version to Windows 10, for example. Feels like a 'we'll cross that bridge if and when we come to it' situation.
Copying To And From Your Deck
As discussed, Steam Link is your friend here. You can download it from: https://media.steampowered.com/steamlink/windows/latest/SteamLink.zip
Lutris Install Methods
No longer necessary but keeping this here for archival purposes.
Installer Packages
Sometimes, often in the case of "repacks" like those from fit-girl or DODI, you'll have an actual Windows installer you need to run.
There are two ways to install games under Lutris: you can use its built-in Windows EXE installer, or you can add games manually.
I'll outline both methods below.
Windows Installer Method
Pre-Configuration
It should only be necessary to do this once.
- In Lutris, click on the 3 horizontal lines icon in the top right > Preferences.
- Under Runners, scroll down to Wine > Options icon.
- Runner Options:
- Wine Version: GE-Proton10-32
- System Options:
- Default Installation Folder: /home/deck/Games/
- System Options:
- Prefer System Libraries: Unchecked
- Runner Options:
- Save.
After some testing I've confirmed that this method does actually work, although it only automates the process partially: you will still need to do some manual config steps.
Again With The Prefixes
Lutris really, really, REALLY does not want you to use the same prefix for multiple games.
If you use this method and try to use a single prefix, it will give you a warning that it can't install to a folder with files in it. You can IGNORE this warning and it should work anyway, but be forewarned that there are risks involved with this approach: any game installer that corrupts the prefix could potentially break all of your games and kill all of your saves.
So why not use separate prefixes for each game? Simple: each game prefix can be around 1gb, so once you have 100 games, that's 99gb of space getting eaten up largely by duplicated files.
The trade-off is safety vs. storage space.
It's really up to you how you want to proceed.
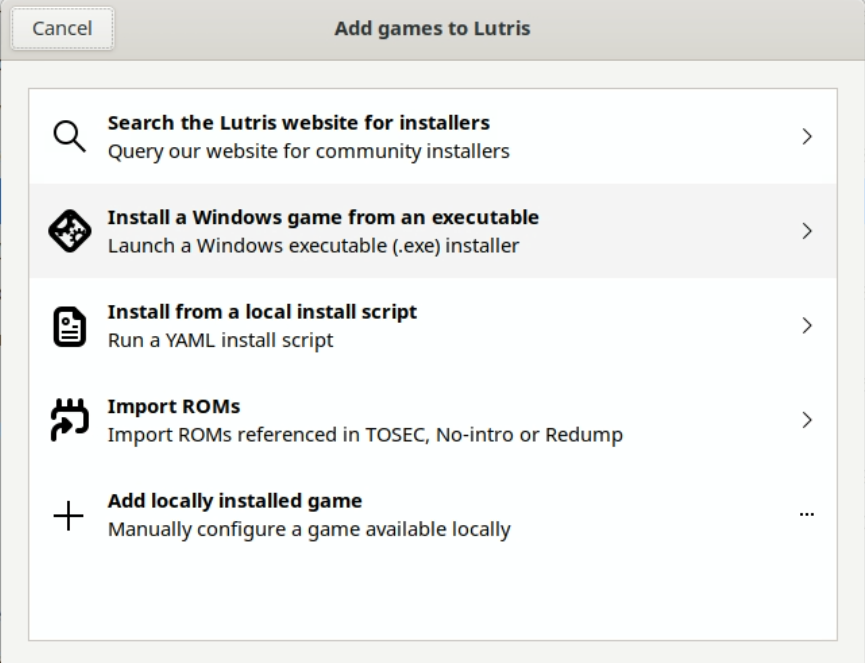
- Click on the + icon in the top left > Install A Windows Game From An Executable.
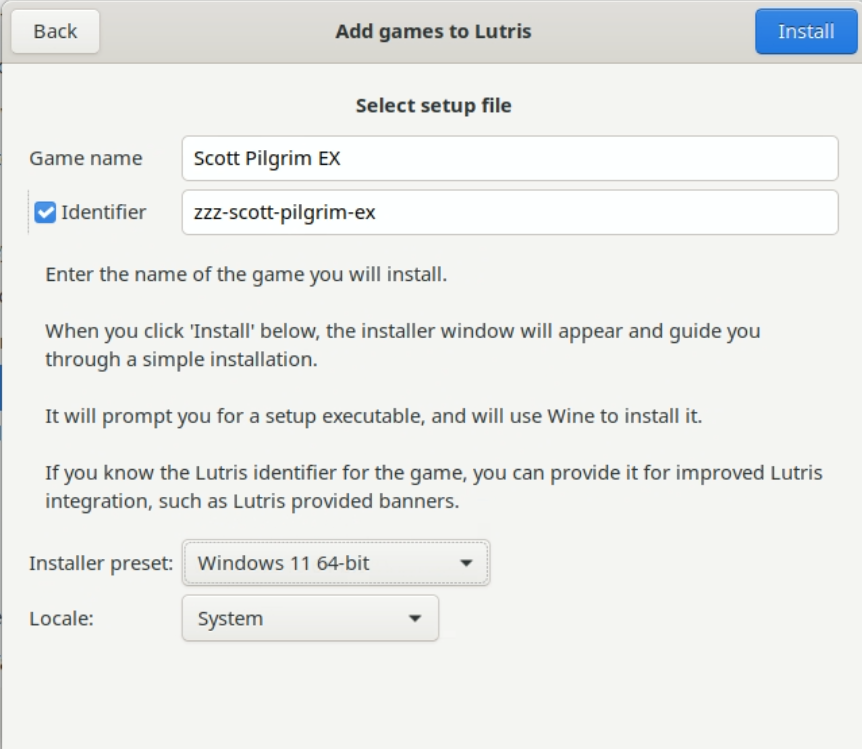
- Game Name: The name of the game.
- Identifier: Check the box and add zzz- to the start of this.
- Installer Preset: Windows 11 64-bit should work for almost everything.
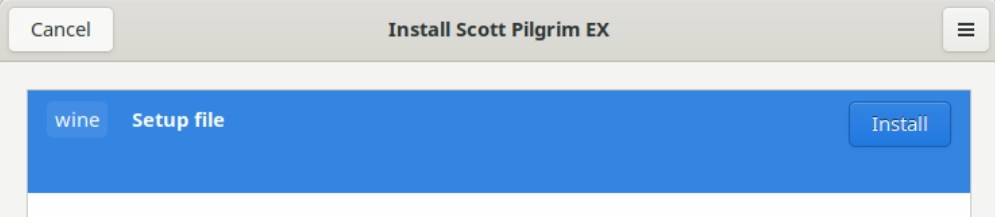
- Click Install > Wine Setup File: Install.
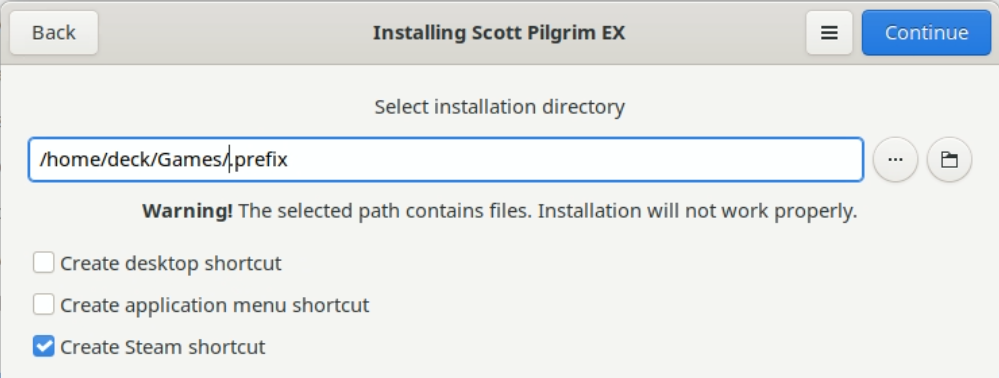
- Installation Directory: Your prefix path:
- /home/deck/Games/.prefix/ if you use a single prefix.
- /home/deck/Games/.lutris/prefix/
if you want separate prefixes per game. - Uncheck all boxes.
- Click Continue.
- Click the ... icon and browse to the installer .exe.
- Click Install. The installer should launch.
- NOTE: Depending on the size of the game, this might take a few minutes to appear.
- The installer will ask for an install path for the game.
- This should be your game install path, ie: /home/deck/Games/
. - Since the installer thinks it's in Windows, this is probably going to be mapped to: Z:\home\deck\Games\
. - Obviously, if you're installing to a MicroSD card, that path will be different.
- This should be your game install path, ie: /home/deck/Games/
- Under Install Components, leave all options checked.
- This is most important if you use separate prefixes per game. If you use a single prefix, you'll probably get a message that the components are already installed.
- The game will install.
- Once it's done, uncheck any options to open websites or launch the game, but leave the component options checked.
- Install the components, let the hash check complete, and manually close the window.
- If prompted, click on Close to close the Lutris window.
Once this has been done, the steps are similar to the Manual Method:
- Find the game in the list and right-click > Configure.
- Click on Game Options.
- Click on the ... icon, navigate to the folder where you installed your game, and select the game's .exe file.
- Click on Save.
- Find the game in the list and right-click > Create Steam Shortcut.
- Restart the Steam Deck for the Steam link to appear.
Step 1: Install Using Lutris Script:
Step 2: Configure Game Details:
Step 3: Install With WINE:
Step 4: Enter Prefix Path:
Step 5: Select Installer EXE:
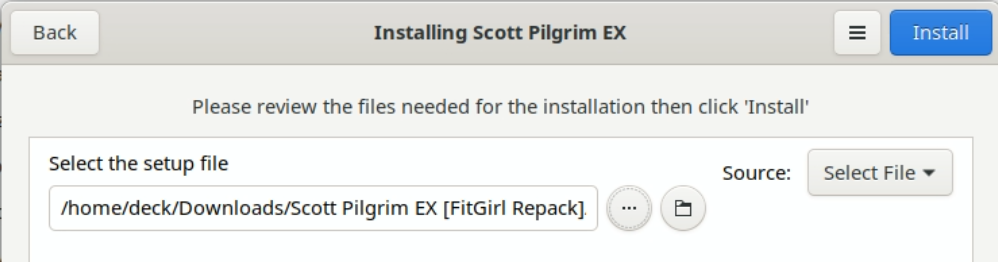
Step 6: Launch Installer:
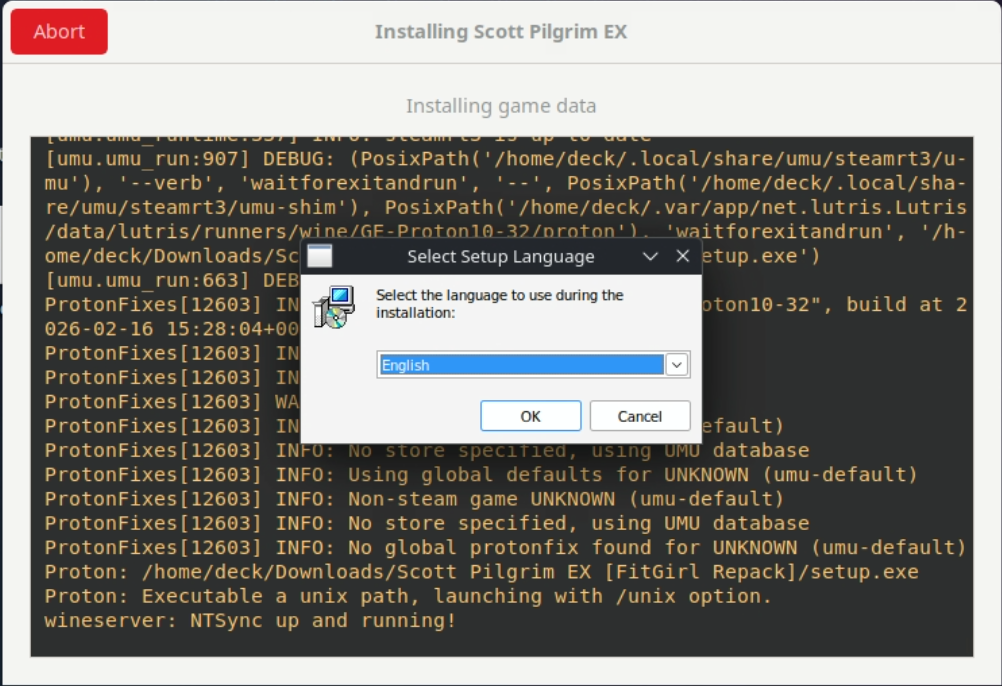
Step 7: Enter Game Install Path:
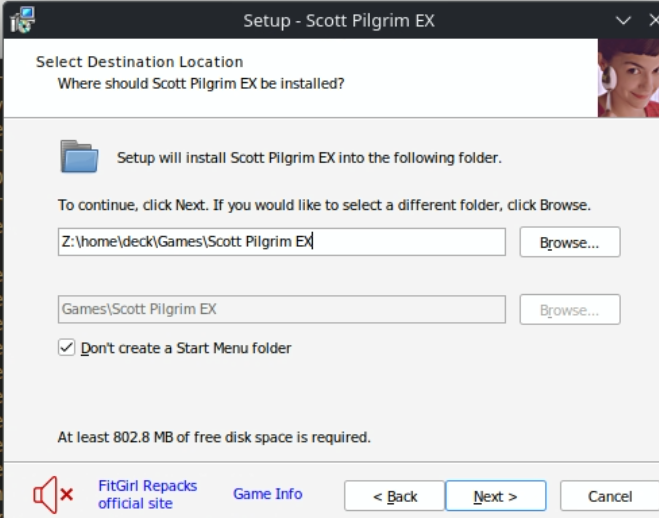
Step 8: Select Components:
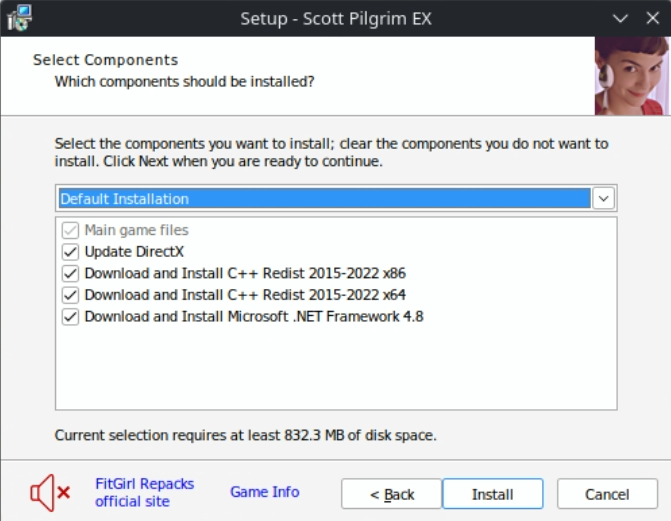
Step 9: Final Installer Options:
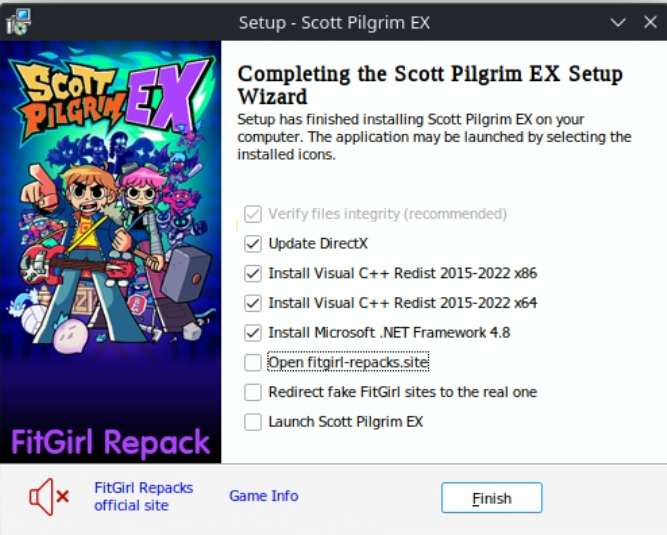
Step 10: Install Complete!:

Manual Method
This method requires you to create a game entry, save it, run the installer, and open it for a second round of configuration.
Part I:
- Open Lutris and navigate to Library > Games.
- Click on the + icon in the top left > Add Locally Installed Game.
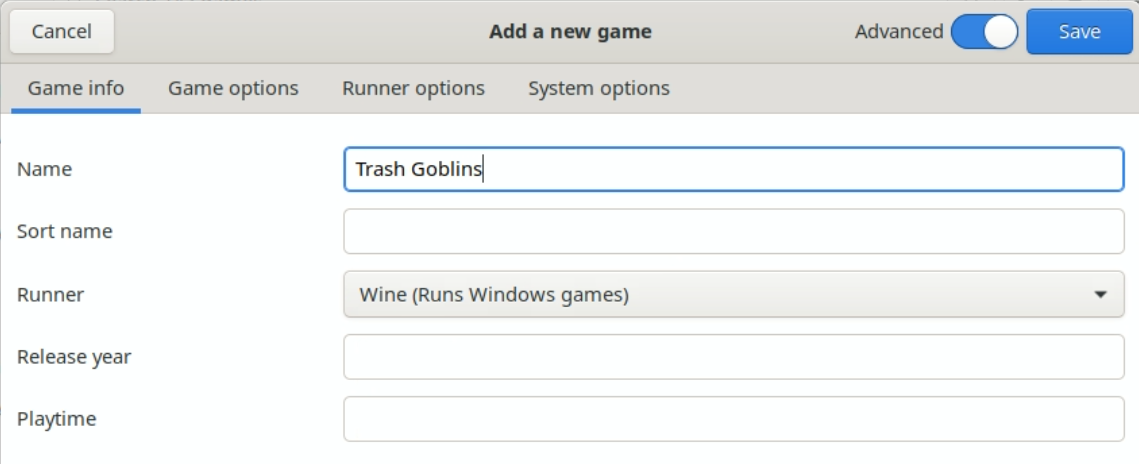
- Game Info:
- Name: The game's name, obviously.
- Runner: Wine
- Game Options:
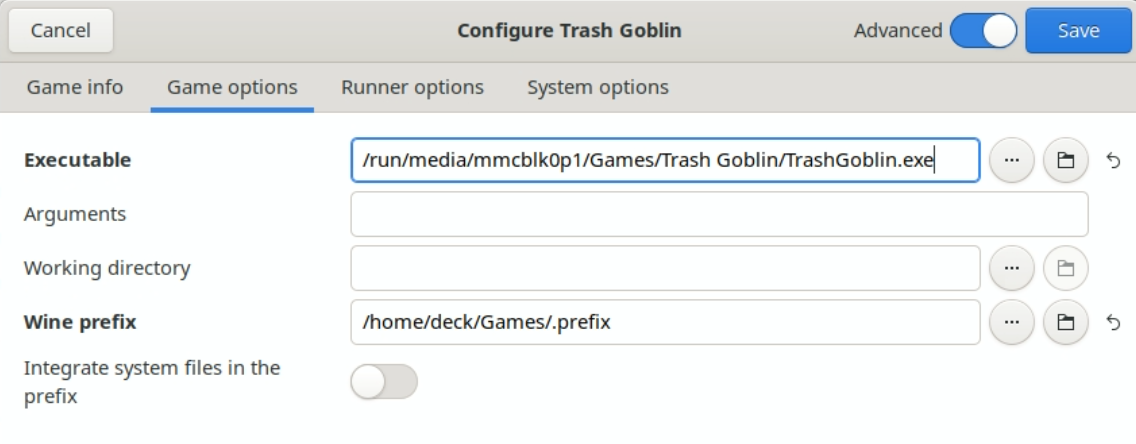
- Executable: The full path and .exe name to launch the game. Leave this empty.
- Wine Prefix: /home/deck/Games/.prefix
- System Options:
- Prefer System Libraries: Uncheck
- Runner Options:
- Wine Version: GE-Proton10-32
- Save the entry.
Part II:
- Find the game in the list and select it.
- Near the bottom (just to the left of Platform: Windows), click the up arrow icon, and select Run EXE Inside Wine Prefix.
- Navigate to the game installer .exe and run it.
- Run through the standard Windows install steps.
- Ensure Copy Crack or any similar such option is checked, if it exists.
- Uncheck Launch Game and any other options at the end of the install.
- If there is a hash check, let it run through and manually close the window once it finishes.
Part III:
- Find the game in the list and right-click > Configure.
- Scroll to Identifier > Change and add zzz- to the start of this (eg.
zzz-hollow-knight). - Click on Game Options.
- Click on the ... icon, navigate to the folder where you installed your game, and select the game's .exe file.
- Click on Save.
- Find the game in the list and right-click > Create Steam Shortcut.
- Restart the Steam Deck for the Steam link to appear.
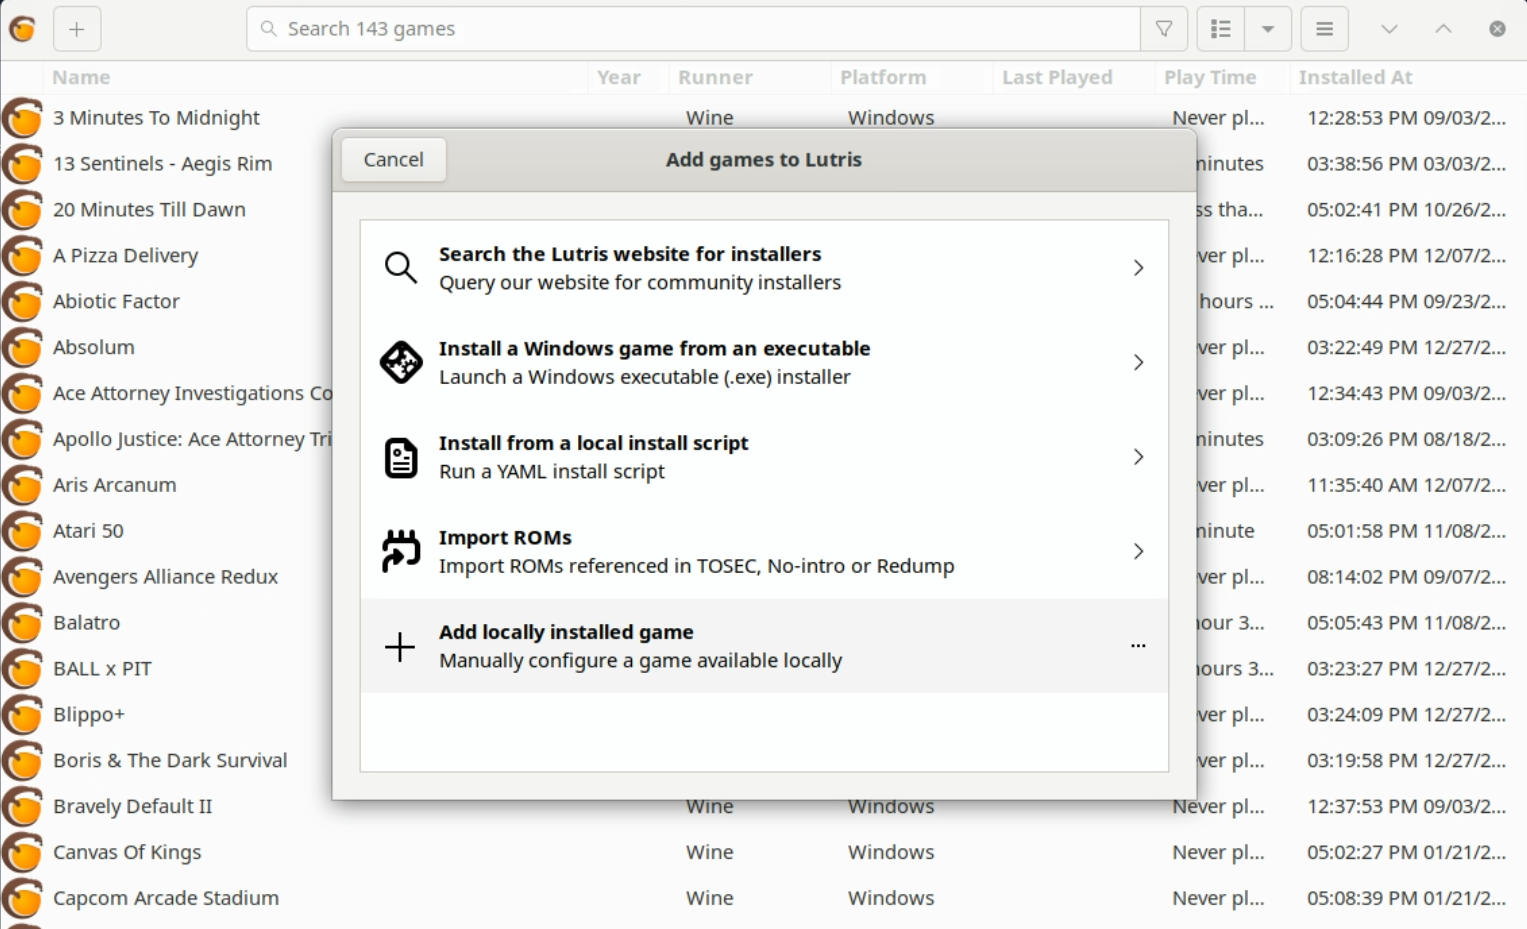
Step 1: Add A Locally Installed Game:
Step 2: Name & Select Wine:
Step 3: Enter Executable & Prefix Paths:
Step 4: Ensure System Libraries Is Off:
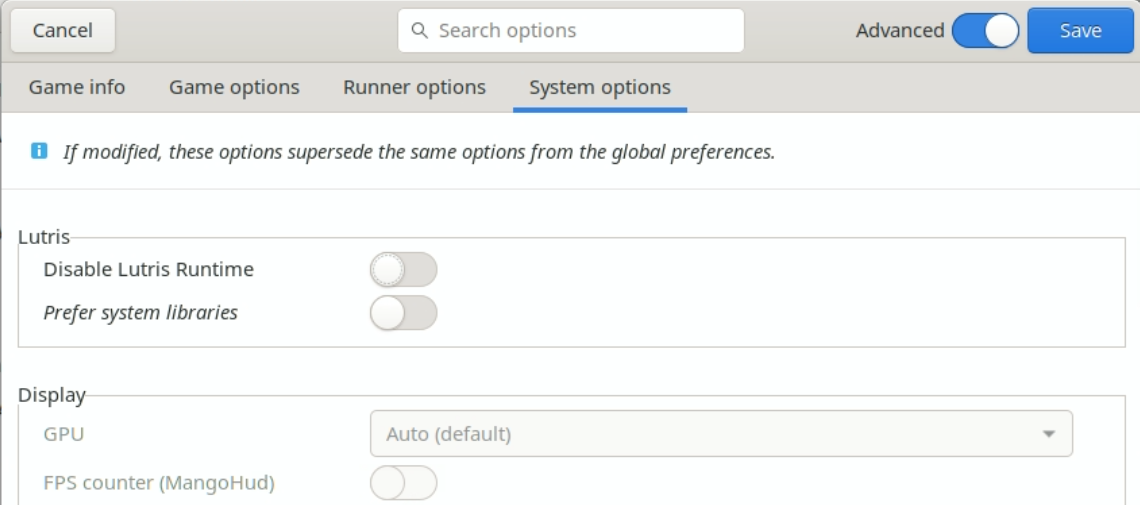
Step 5: Select GE-Proton:
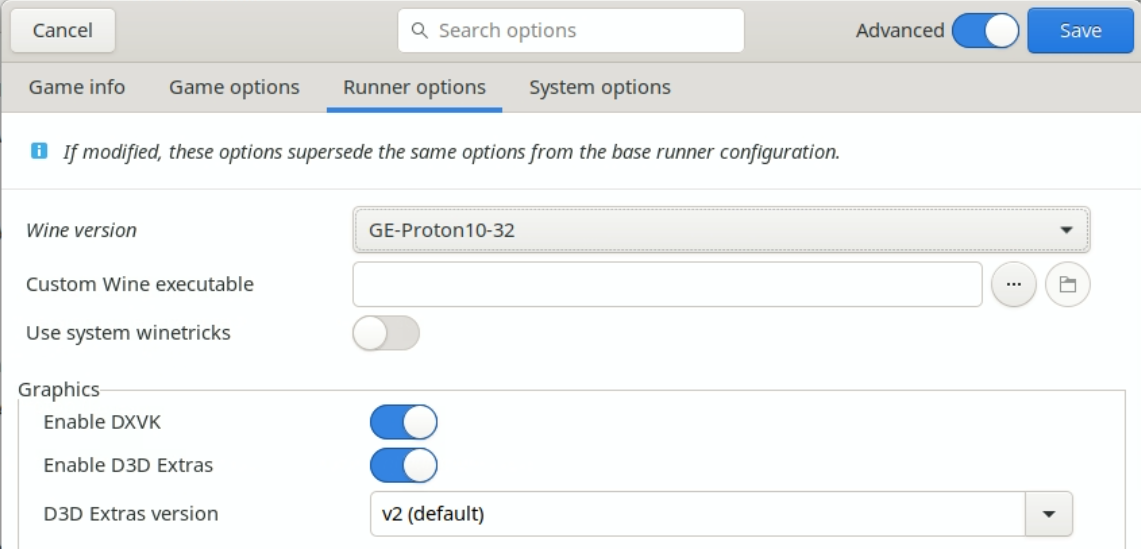
Step 6: Run EXE In Prefix:
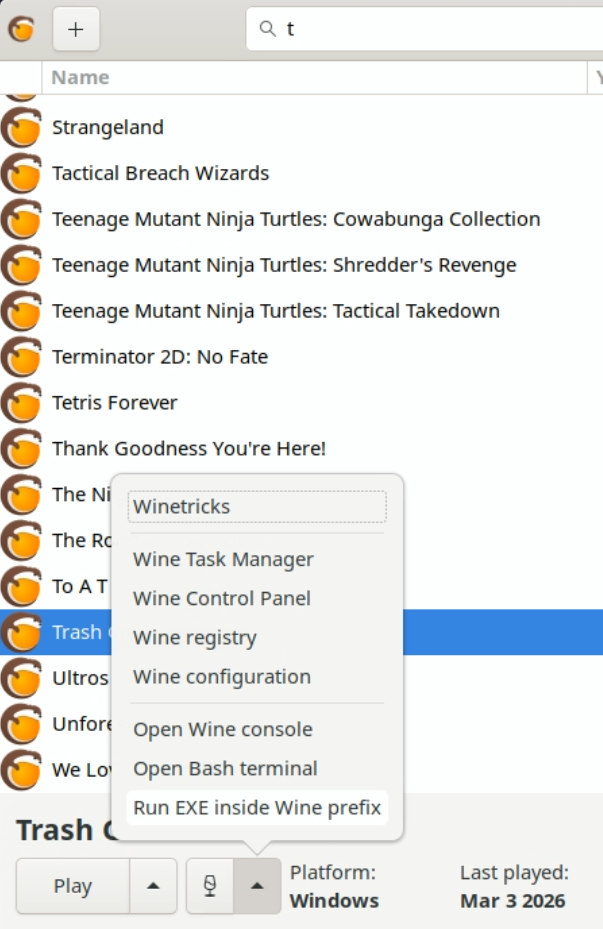
Step 6: Create Steam Shortcut:
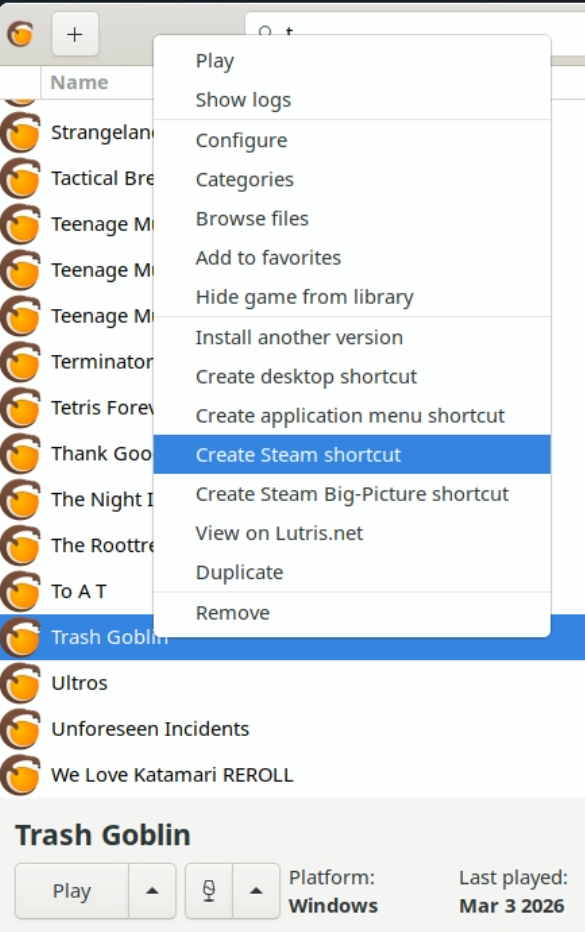
Repack Installers
I haven't run a DODI installer for a while, but Fit-Girl installers include an option to Limit Installer RAM Usage To 2GB.
Honestly, even though this is specifically intended for Steam Deck installations, I rarely bother to check it and only go back and do so if the install hangs or fails, since the downside is that it will cause your installation to take 5x as long to complete.
Portable Installs
Whenever possible, I recommend going with a portable install as they're the easiest to work with:
- Right-click on the .zip > Extract.
- Move the folder to /home/deck/Games.
- In Lutris, create a game entry and point the executable to /home/deck/Games/(game name)/(game.exe).
- Right-click and Create Steam Shortcut.
Portable Game Folders
You'll notice that in the root folder of unzipped games downloaded from SteamUnlocked, there will be some promotional links, readmes, a Redist folder and the actual game folder.
You can and should copy just this internal game folder out to /home/deck/Games.
Since you will have already run the AOI redist installer on your prefix path, you won't need anything else here.